Cat Door Installation Guide — Glass & Wood Fitting Step by Step
Installing a cat door correctly the first time saves you time, money, and the frustration of a poorly fitting result. Whether you're fitting into glass, timber, PVC or a composite panel, this guide walks you through exactly what's involved: what your glazier needs to know, how to prepare, and what makes Pet-Tek's round cut-out design faster and cleaner to install than any rectangular alternative. For help choosing the right model first, see our cat flap advice guide.
- Glass fitting installation requires a qualified glazier with core drilling equipment, but fitting the Pet-Tek door unit once the hole is cut can be done by the homeowner.
- Wood fitting installation is DIY-friendly with basic tools: a jigsaw or hole saw, drill, tape measure and screwdriver are all you need.
- Always confirm whether your glass is toughened before ordering; toughened glass cannot be cut after the toughening process and requires a replacement panel with the hole pre-cut.
Before You Start — What to Confirm
Before booking a glazier or picking up a drill, confirm these four things:
- Your installation surface: glass panel, timber door, PVC door, composite door, or wall
- Your panel thickness: glass models suit 3mm–28mm depending on the model, wood fitting models suit 11mm–52mm depending on the model
- Your cat's measurements: widest point and body depth (top of the back to the bottom of the chest), each plus 25mm, for the minimum usable opening; the top of the opening should sit at least 25mm above the shoulder. See our how to measure your pet guide for full instructions
- Whether your glass is toughened: toughened glass cannot be cut after toughening. The hole must be cut before the toughening process, which means replacing the panel rather than retrofitting
Key rule: Always confirm your glass type before ordering. If in doubt, ask your glazier; they can identify toughened glass on sight. Getting this wrong means replacing the entire panel.
Option A — Glass Fitting Installation
Glass fitting cat door installation must be carried out by a qualified glazier. It is not a DIY job; cutting glass requires specialist core drilling equipment and training. However, fitting the Pet-Tek door unit once the glass is cut is straightforward and can be done by the homeowner. The Glass & Glazing Federation recommends always using a qualified glazier for any glass cutting work on sealed units. See our dedicated glass fitting cat door range for model specifications. Once the unit is seated, two build details take over: the internal draft angles shed any rain that gets driven into the body, and the flap runs at next to zero tolerance behind its brush seal, so the finished install stays dry and draught-free without any extra sealing work from you.
What Your Glazier Will Do
- Confirm the glass type: single, double, laminated, toughened. This determines whether the existing panel can be cut or needs to be replaced
- Mark the cut-out position: the bottom of the flap opening should sit about level with your cat's belly, roughly 10–15cm above floor level. Mark the centre point clearly on both sides of the glass
- Core drill the round hole: Pet-Tek uses a round cut-out which is drilled in a single pass with a core drill bit. No corner grinding, no stress fractures, clean result every time
- Dress and clean the cut edge: the glazier will smooth and clean the drilled edge before fitting
- Fit the Pet-Tek door unit: insert the door unit from one side, fit the retaining ring from the other side, and secure
- Apply silicone seal: a bead of silicone around the outer ring weatherproofs the installation
Why round cut-outs matter: Most competitor cat doors require a rectangular cut-out. Rectangular cuts are significantly harder to execute cleanly: corners must be ground out separately, and sharp corners in glass create stress fracture points. Pet-Tek's round cut-out is drilled in one pass, is faster for glaziers, and produces a stronger, cleaner result. It is one of the primary reasons glaziers across NZ, Australia and the UK prefer our products.
Glass Fitting — Installation Checklist
| Step | Who Does It | Notes |
|---|---|---|
| Confirm glass type and thickness | Glazier | Critical: toughened glass cannot be retrofitted |
| Confirm cut-out diameter | Homeowner / Glazier | Check product specs for your specific model |
| Mark cut-out position | Glazier | Bottom of opening about belly height, roughly 10–15cm above floor |
| Core drill round hole | Glazier | Single pass, round profile only |
| Dress cut edge | Glazier | Smooth and clean before fitting |
| Fit door unit and retaining ring | Glazier or Homeowner | Straightforward once hole is cut |
| Apply silicone seal | Glazier | Around outer ring, weatherproofs installation |
| Test flap operation and lock | Homeowner | Test all 4 lock positions |
- Round cut-out size: 245mm or 267mm for cat doors, depending on model
- Your glass type & thickness: single, double glazed, laminated or toughened
- The fitting instructions from the box — glass range and clamping detail
Any qualified glazier can do this — most complete it in under an hour.
Option B — Wood Fitting Installation
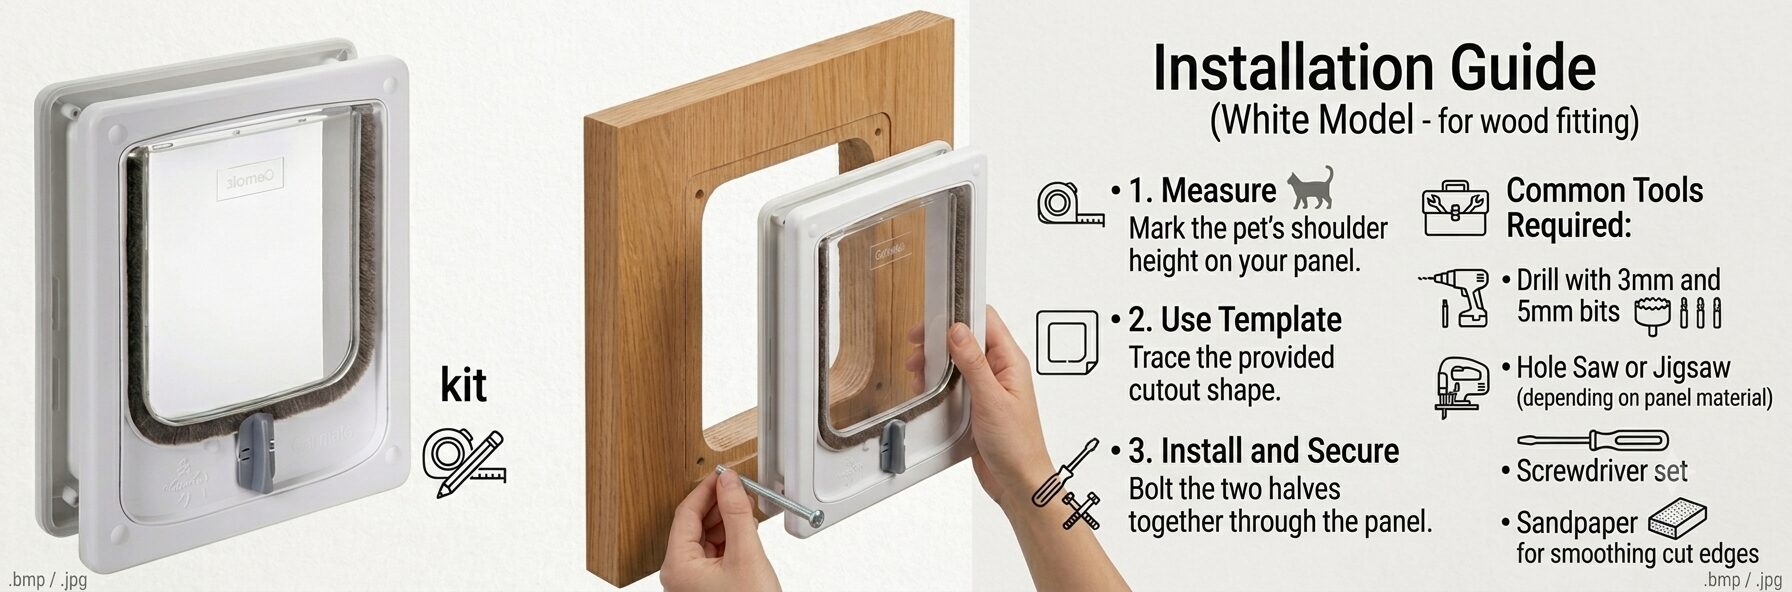
Wood fitting cat door installation can be carried out by a competent DIYer with basic tools: a jigsaw or hole saw, a drill, and a tape measure. No glazier is required. The Pet-Tek wood fitting range includes slimline models for thinner panels and tunnel models for thicker doors.
Tools You Will Need
- Tape measure and pencil
- Drill with appropriate bit
- Jigsaw or hole saw (check product instructions for required cut-out shape)
- Sandpaper or file to dress cut edges
- Screwdriver
- Silicone sealant (recommended for exterior installations)
Wood Fitting — Step by Step
- Measure and mark: measure your cat and mark the centre of the cut-out on the door. The bottom of the flap opening should sit about level with your cat's belly, roughly 10–15cm above the floor
- Check panel thickness: confirm your door panel thickness against the product specifications. Slimline models suit 11mm–30mm, tunnel models suit 11mm–52mm
- Cut the opening: follow the template provided with the product. Use a jigsaw for rectangular openings or a hole saw for round profiles
- Dress the cut edges: sand or file the cut edges smooth to prevent splinters and ensure a clean fit
- Fit the door unit: insert the housing from the outside face of the door and secure with the screws provided
- Fit the inner frame: for tunnel models, the inner frame closes up to your panel thickness automatically, no cutting required
- Apply silicone: run a bead of silicone around the outer frame on exterior installations for weatherproofing
- Test all lock positions: check all 4 lock positions operate correctly before letting your cat use the door
- Panel thickness: slimline 11–30mm, tunnel models 11–52mm
- Use the template supplied in the box — never cut freehand
- Dress the cut edges smooth before fitting the housing
Works in timber, PVC and metal panel doors — DIY with basic tools.
Positioning — Where to Install Your Cat Door
Correct positioning is important for both usability and performance:
- Height from floor: the bottom of the flap opening should sit about level with your cat's belly, roughly 10–15cm above floor level, so the top of the opening is at least 25mm above the shoulder
- Distance from frame edge: the centre of the cut-out should be at least 100mm from any frame, edge, or seal. For double glazed units, check with your glazier
- Avoid direct wind exposure: where possible, install on a sheltered side of the building to minimise wind pressure on the flap
- Consider your cat's approach: make sure there is a clear, comfortable approach path on both sides: no obstacles, steps, or drops that could deter use
After Installation — Training Your Cat
Most cats adapt to a new cat door quickly, particularly if it is positioned correctly and the flap is rigid and transparent (so they can see through it). A few tips to help:
- Initially prop the flap open with tape so your cat can walk through without pushing; this removes the initial hesitation
- Use treats or food to encourage your cat to approach and pass through
- Once comfortable walking through the open flap, introduce the flap gradually; let it rest against their back as they pass
- Most cats are using the door independently within a few days
- For dogs, see our 5 tips to train your dog to use a dog door guide
Frequently Asked Questions
Ready to find the right cat door for your home?
Use our interactive size guide to find the perfect Catwalk® or Dogwalk® model for your pet and your installation type.
Find My Pet Door →